Looking for help with your Windows video editor custom audio? You’re not alone! This is a common problem that many people experience on Windows and we’re here to help.
In this article, we will walk you through the steps to fixing this issue. Don’t worry, it’s easier than you think!
To fix various Windows 10/11 problems, we recommend Outbyte PC Repair:
This software will repair common computer errors, protect you from file loss, malware damage, hardware failure, and optimise your computer for peak performance. In three simple steps, you can resolve PC issues and remove virus damage:
- Download Outbyte PC Repair Software
- Click Start Scan to detect Windows 10/11 issues that may be causing PC issues.
- Click Repair All to fix issues with your computer's security and performance.
This month, Outbyte has been downloaded by 23,167 readers.
What is Windows Video Editor?
The Windows 11 Video Editor is a native component of the Windows Photos application that has several excellent features, including the ability to add custom audio. It is similar to the Windows Movie Maker and can be used to edit and trim videos and create slideshows, clips, and movies.
This means that you can add your own music or audio track to a video, which is great for personalizing your videos or adding a creative touch.
However, many users have reported that they are unable to get the custom audio feature to work properly. If you’re experiencing this issue, don’t worry! We will show you how to fix it.
How to use Custom Audio in Windows Video Editor?
If you want to add custom audio to your videos, you can easily do that using the Windows video editor. Here are the steps for that:
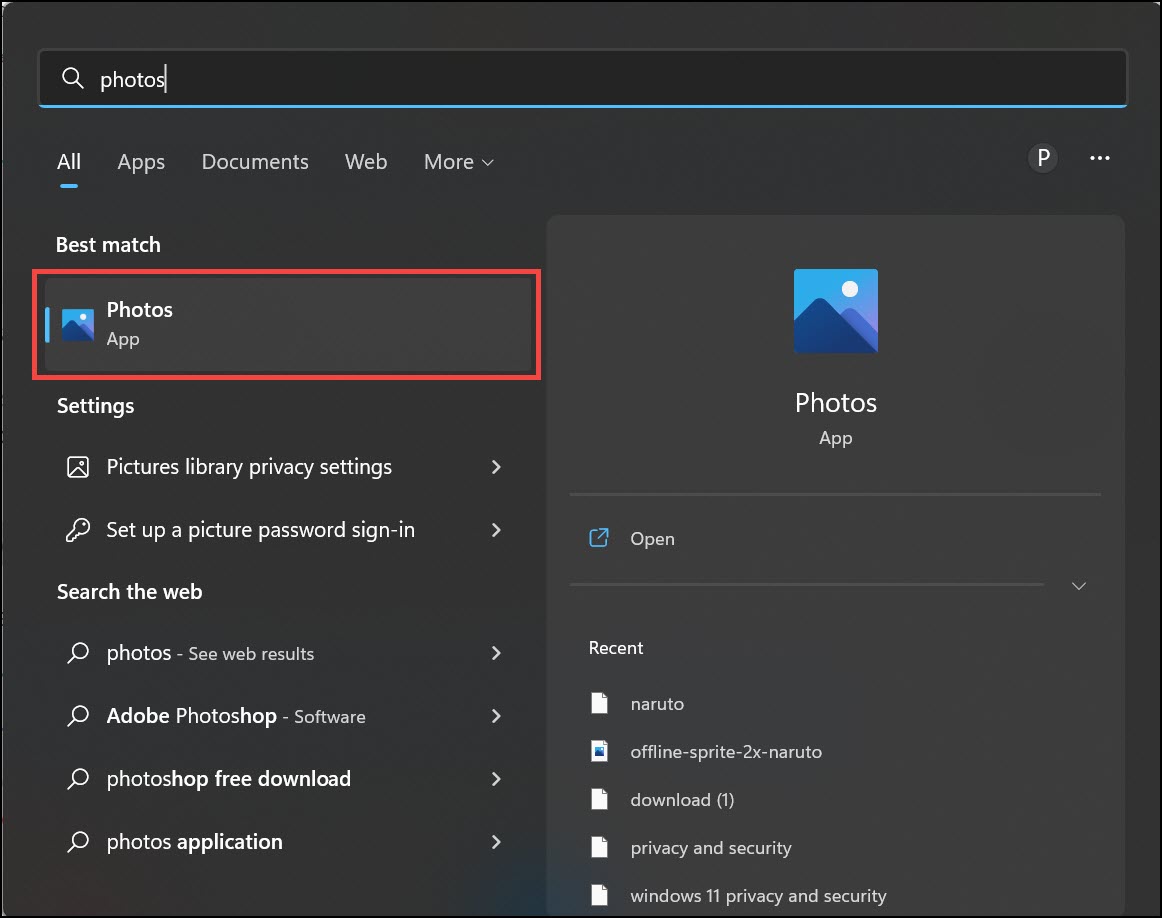
- On your Windows search box, type Photos and click on its icon to launch the app.
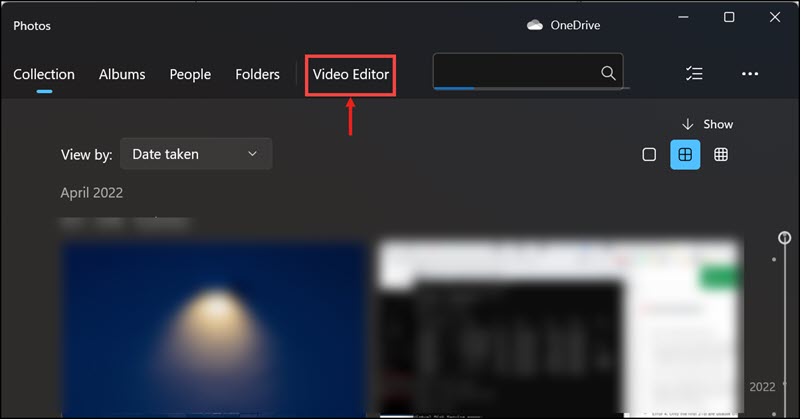
- Once the app is launched, switch to the Video Editor tab.
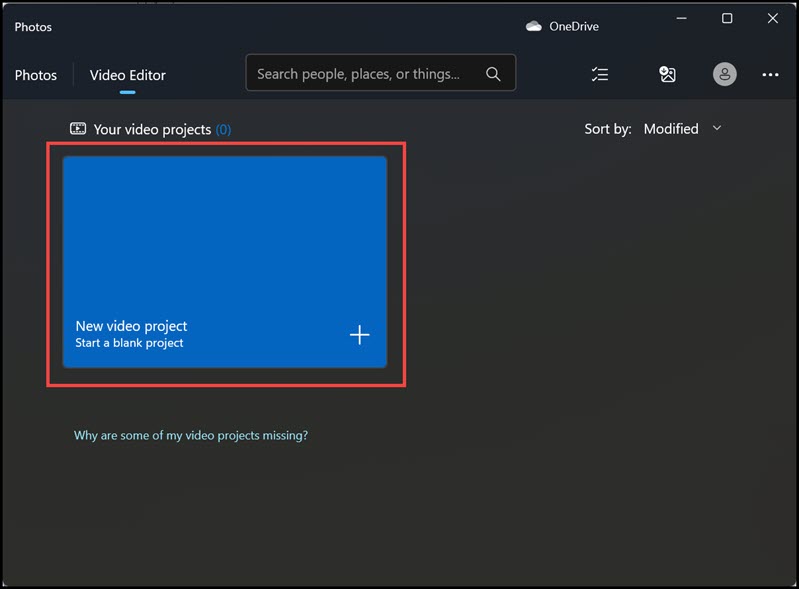
- Click on the New video project button to start a new project.
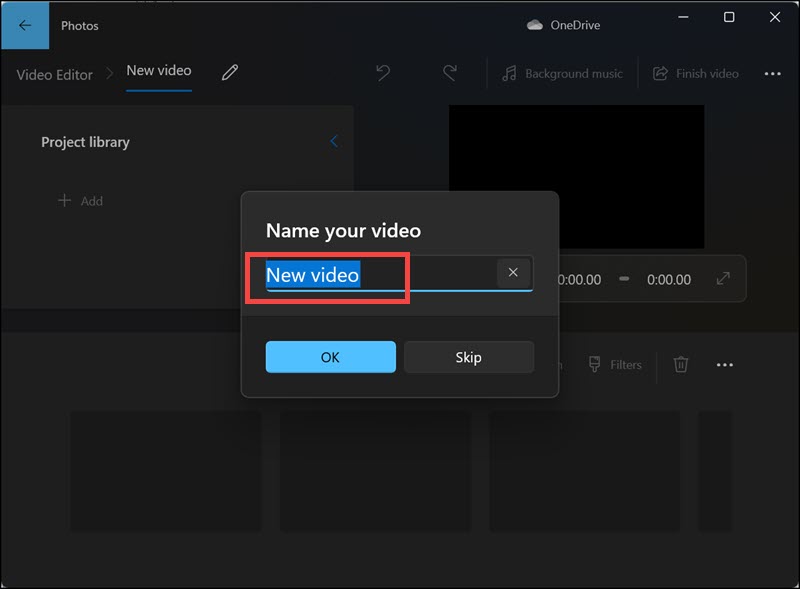
- Next, name your video project.
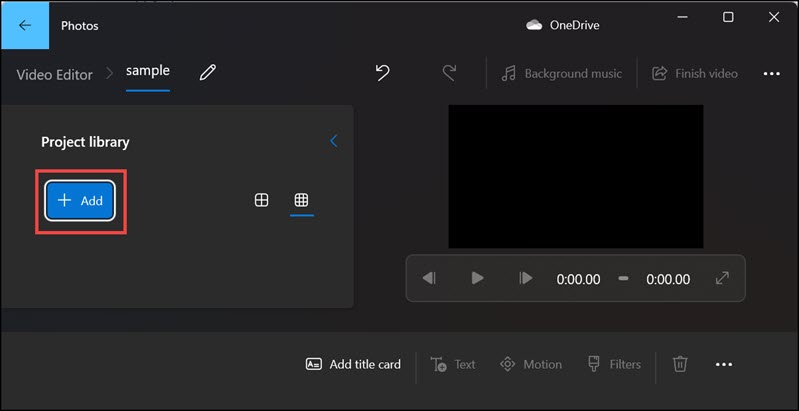
- Click on the Add button to add the video file that you want to edit.
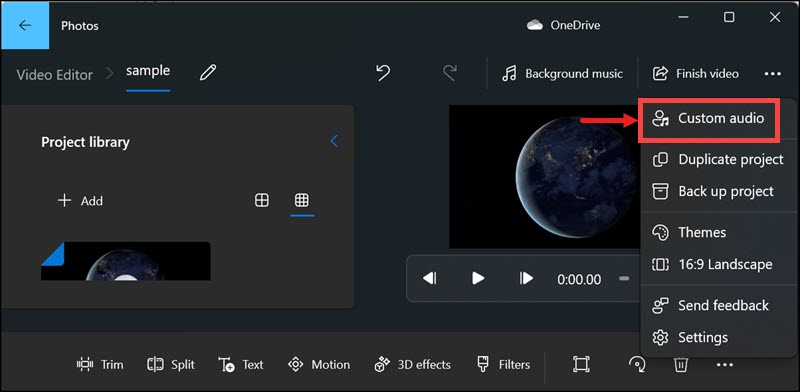
- After adding a video, click on the three dots icon and select the Custom audio option.
- Click on the Add audio file button to add a custom file of your choice.

- Finally, click Done.
Why does Windows Video Editor Custom Audio Not Working?
There are several reasons why the custom audio feature might not be working properly on your Windows video editor. Here are some of the most common reasons:
- The file format of your custom audio is not supported by the Windows video editor.
- Your custom audio file is corrupt or damaged.
- There is a problem with your Photos app.
- There might be a problem with the audio service and since the photos app is linked to Windows audio service, custom audio might not work.
How to Fix Windows Video Editor Custom Audio Not Working?
Restart Windows Audio Service
If you’re experiencing issues with the custom audio feature in the Windows video editor, one of the first things you can try is restarting the Windows Audio Service. This is a service that is responsible for managing audio on your computer and it’s possible that it might be having some issues.
Here’s how to restart the Windows Audio Service:
- Open the Services window by typing services.msc in the Run dialog box.

- Locate the Windows Audio service from the list of all services.
- Right-click on the Windows Audio service and select Restart.

Change Exclusive Mode Settings
If restarting the Windows Audio Service doesn’t fix the issue, you can try changing the exclusive mode settings. Exclusive mode is a feature that allows applications to take control of audio devices and it’s possible that it might be causing some issues with the custom audio feature.
To change the exclusive mode settings, follow these steps:
- Navigate to Control Panel -> Hardware and Sound.

- Click on Sound settings.

- Under the Playback tab, double-click on your headphones option.

- Under Exclusive Mode settings, uncheck the option “Allow applications to take exclusive control of this device.“
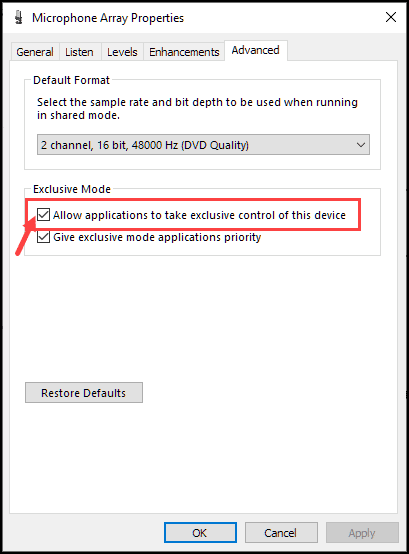
- Click Apply and OK.
Is Microsoft’s video editor any good in Windows 11?
When it comes to basic video editing, Microsoft’s video editor is pretty good. It has all of the features that you would expect from a basic video editor, including the ability to add custom audio.
However, there are some drawbacks. For one, it doesn’t have as many features as some of the more advanced video editors out there. Additionally, it can be a bit buggy and it doesn’t always work as smoothly as you would like.
Overall, Microsoft’s video editor is a decent option for basic video editing. However, if you need something more powerful, you may want to consider one of the other options.
Summing Up
If you’re experiencing issues with the custom audio feature in the Windows video editor, there are several things that you can try to fix it. The first thing you can try is restarting the Windows Audio Service. If that doesn’t work, you can try changing the exclusive mode settings. If neither of those solutions works, then there might be a problem with the Photos app and you can try reinstalling it.
We hope that this article was helpful and that you were able to fix the custom audio issue on your Windows video editor.
To add audio to a video in Windows Movie Maker, click on the Add music button and select the file that you want to use.
Windows Movie Maker is no longer available for download. However, you can still use the Photos app to edit videos on your computer.
Windows Movie Maker was discontinued in 2017 and is no longer available for download. However, you can still use the Photos app to edit videos on your computer.
Peter is an Electrical Engineer whose primary interest is tinkering with his computer. He is passionate about Windows 10 Platform and enjoys writing tips and tutorials about it.

