Are you having trouble with your Windows 10/11 jump list? Is the Windows jump list not working or missing on your system? Don’t worry – we’re here to help!
The jump list is a handy Windows feature that allows you to quickly access your most commonly used files and applications. However, if it’s not working properly, it can be quite frustrating. Fortunately, the issue is usually easy to fix.
To fix various Windows 10/11 problems, we recommend Outbyte PC Repair:
This software will repair common computer errors, protect you from file loss, malware damage, hardware failure, and optimise your computer for peak performance. In three simple steps, you can resolve PC issues and remove virus damage:
- Download Outbyte PC Repair Software
- Click Start Scan to detect Windows 10/11 issues that may be causing PC issues.
- Click Repair All to fix issues with your computer's security and performance.
This month, Outbyte has been downloaded by 23,167 readers.
In this blog post, we will walk you through the steps to take in order to fix the problem. Read on for instructions on how to get your jump list up and running again!
What is Windows Jump List?
A jump list is basically a list of shortcuts that allows you to quickly access your most-used files and applications. The feature was first introduced in Windows Vista and has been available in all subsequent versions of Windows since then.
The jump list can be accessed by right-clicking on the icon of the program in question – for example, if you want to access the jump list for Microsoft Word, you would simply right-click on the Word icon in your taskbar.
Why is Windows Jump List not Working?
There are a few different reasons why the Windows jump list might not be working properly.
- Corrupt User Profile: If you’re encountering jump list issues, one of the first things you should check is your user profile. Sometimes, a corrupt user profile can cause problems with various Windows features – and the jump list is no exception.
- Problem with Program’s Cache: The jump list is powered by a cache that stores information about the most recently used files and applications. If this cache becomes corrupt, it can cause the jump list to stop working properly.
- Incorrect Taskbar Settings: It’s also possible that the problem is simply due to an incorrect setting in the taskbar.
How to fix Jump List not working on Windows?
There are a few different things you can try in order to fix the problem.
Restart your System
One of the simplest and most effective solutions is to simply restart your system. This will often fix any temporary glitches that might be causing the jump list to malfunction.
Check Your User Profile
As we mentioned above, a corrupt user profile can sometimes cause problems with the jump list. To check if this is the case, you can try creating a new user account and seeing if the jump list works properly in that account.
If the jump list is working properly in the new account, it’s likely that your original user profile is indeed corrupt. In that case, you can either try to fix the corrupt profile or simply delete it and use the new account as your primary one.
Check for App Updates
If you’re having trouble with the jump list for a specific application, for example, Google Chrome, it’s possible that the problem is due to an outdated version of the app. In that case, you can try updating the app to see if that fixes the issue.
Check Windows Settings
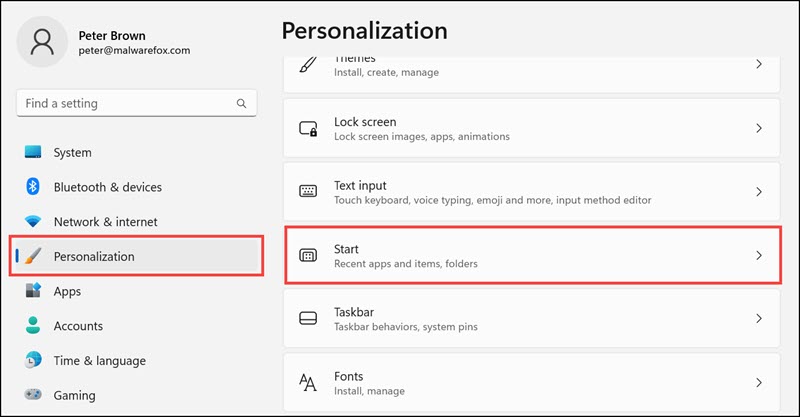
It’s also possible that the problem is due to an incorrect setting in Windows. To check if this is the case, follow these steps:
- On your Windows system, open Settings.

- Switch to the Personalization tab on the left pane and select Start on the right.
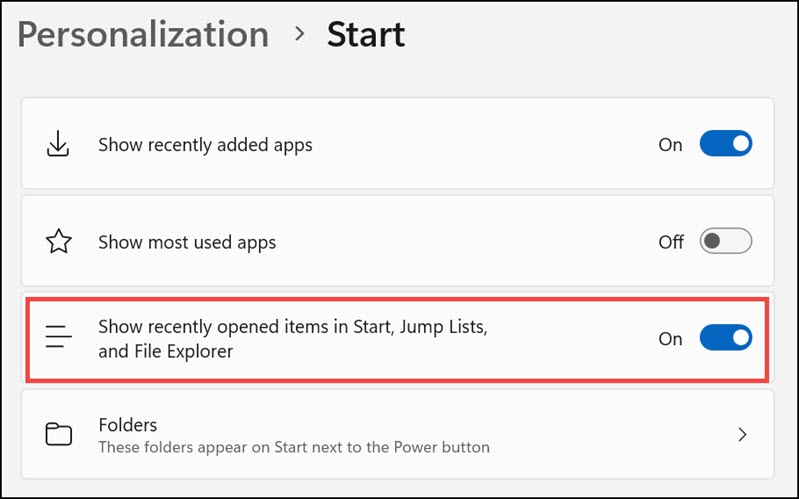
- Under Start settings, ensure that the Show recently opened items in Start, Jump Lists, and File Explorer option is turned On.
Rebuild Jump List in Windows
It is possible that the file containing the jump list is corrupted. So, if none of the above solutions work, you can try rebuilding the jump list. This will delete the current jump list cache and rebuild it from scratch.
To rebuild the jump list, follow these steps:
- On your Windows system, open the File Explorer, and navigate to the following address: %AppData%\Microsoft\Windows\Recent\AutomaticDestinations
- Look for the file named 1b4dd67f29cb1962.automaticDestinations-ms. Select and delete this file.
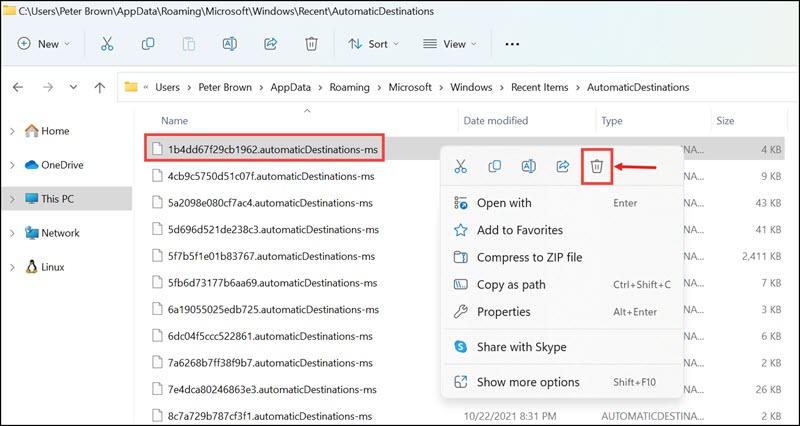
- If you cannot find this file, just delete all the automaticDestinations-ms files you find in the folder.
- After deleting the file, close the folder and restart the system and check if the jump list is working or not.
Update Windows
If you’re still having trouble with the jump list, it’s possible that the problem is due to a bug in Windows itself. In that case, you can try updating Windows to see if that fixes the issue.
To update Windows, follow these steps:
- Open Windows 11 Settings.
- On the left pane, switch to the Windows Update tab and click on Check for updates on the right.

- After the latest updates are finished downloading, click on Install now.

- Restart your device.
Summing Up
If the Windows jump list is not working, there are a few different things you can try in order to fix the problem. Restarting your system, checking for app updates, and rebuilding the jump list cache are all potential solutions. If none of those work, you can try updating Windows itself.
We hope that this article was helpful and that you were able to fix the problem with the jump list on your Windows system. If you have any further questions or comments, please let us know in the comments section.
To clear your jump list cache, you need to delete the file called AutomaticDestinations-ms. This file is located in the following folder: %AppData%\Microsoft\Windows\Recent\AutomaticDestinations.
Yes, the jump list feature is available on Windows 11.
The Jump List feature in Windows allows you to quickly access recent files and frequently used programs. You can access the Jump List for a particular application by right-clicking on its icon in the taskbar.
If the Windows jump list is not working, there are a few different things you can try in order to fix the problem. Restarting your system, checking for app updates, and rebuilding the jump list cache are all potential solutions.
Peter is an Electrical Engineer whose primary interest is tinkering with his computer. He is passionate about Windows 10 Platform and enjoys writing tips and tutorials about it.