Is your Windows 11 computer running slow? Do you wish you could speed it up and make it run like new again? If so, then you’re in luck!
In this guide, we will walk you through the steps that you can take to optimize your computer for maximum performance. We will cover everything from basic tips to more advanced solutions. So whether your computer is brand new or a few years old, there is something for everyone in this guide.
To fix various Windows 10/11 problems, we recommend Outbyte PC Repair:
This software will repair common computer errors, protect you from file loss, malware damage, hardware failure, and optimise your computer for peak performance. In three simple steps, you can resolve PC issues and remove virus damage:
- Download Outbyte PC Repair Software
- Click Start Scan to detect Windows 10/11 issues that may be causing PC issues.
- Click Repair All to fix issues with your computer's security and performance.
This month, Outbyte has been downloaded by 23,167 readers.
Let’s get started!
Why is Windows 11 Slow?
There can be a variety of reasons why your Windows 11 computer is running slow. Some of the most common culprits include:
- Old hardware – Your computer may be old and outdated, and as a result, it may not be able to handle the latest versions of Windows 11.
- Too many programs running at once – If you have too many programs running at once, then your computer’s resources may be overworked.
- Too many tabs open in your browser – If there are too many tabs open in your browser, then it can slow down the performance of all other applications on the system because they share memory space with each other. This is especially true if you are running a lot of resource-intensive programs like Adobe Photoshop or Illustrator.
- Registry errors – The registry is a database that stores all of the settings and options for your computer. If there are any errors in the registry, it can cause your system to run slowly.
- Hard drive problems – Your hard drive may be full or damaged, which can cause your computer to run slowly.
- Viruses or malware – If your computer is infected with a virus or malware, it may be running slowly as a result.
- Outdated OS – It is possible that the latest version of Windows 11 is not installed on your system causing the system to slow down.
- Outdated Drivers: Like outdated OS, outdated drivers can also cause disturbance in the proper functioning of the system and make Windows 11 slow.
- Broken Applications: Some applications might not be installed correctly resulting in abnormal resource consumption causing the device to slow down.
How to speed up Windows 11?
Disable Startup Apps
When you install new applications on your system, some of them secretly gain permission to run on startup. Such applications might unnecessarily consume system resources at the startup even if you don’t want to use them.
That is one of the leading causes of slow Windows 11. The apps tend to slow down the boot-up process. So, once you disable all the unnecessary apps, the performance will improve.
To disable the startup Apps on Windows 11, follow these steps:
Right-click on the Start button and select Task Manager from the context menu.

On the Task Manager window, switch to the Startup tab and check the list of startup programs.

Select the program you want to disallow on system startup and click the Disable button at the bottom.

Disable all the unnecessary programs on the system startup by following the above steps.
Defragment the Drives (only for HDDs)
If you are using the HDD on your system, it tends to get fragmented with time and highly slow down the tasks like copy & paste, search, and more. So, they need to be defragmented periodically. This does not happen in SSDs, so they are not supposed to be defragmented.
Here are the steps to defrag your HDDs on Windows 11:
- Launch Windows 11 File Explorer from the Start Menu.
- Navigate to This PC tab from the left pane and choose the drive that you want to defrag.
- Right-click and select Properties.
- Switch to the Tools tab, and under Optimize and defragment, click on Optimize.

- On the Optimize Drives window, select the drive you want to defrag and click on the Optimize button.

Turn on Fast Startup
Windows 11 comes with an in-built feature that quickly reboots your system upon shutdown. The Fast Startup feature is not new in Windows 11. The feature was first introduced in Windows 10. However, it does not work after a restart.
Although Fast Startup is by default turned ON, for some reason, it might be disabled and causing a slow boot. To turn on Fast Startup on Windows 11, follow these steps:
- On the Windows 11 search bar, type Control Panel and click on its icon to launch.

- Click on System and Security.

- On the next window, under Power Options, click on Change what the power buttons do.

- Next, click on the Change settings that are currently unavailable. You will be able to do that only if you are logged in with an Administrator account.

- Under Shutdown settings, check the Turn on fast startup (recommended) option to enable it.

- Click Save changes button.
Update Windows 11 Drivers
Outdated drivers can also slow down your system. Although in modern systems, drivers automatically get updated with Windows Update, if you want to do that manually, the Device Manager is the way.
Device Manager is the in-built component of the Control Panel that helps in updating, installing, and uninstalling the device drivers.
To update Windows 11 drivers through Device Manager, follow these steps:
- Right-click on the Start button and select Device Manager from the context menu.

- The Device Manager window will be opened, where you can see all the installed drivers.

- On the Device Manager window, right-click on the component you want to update and select Update Driver from the list.

- On the next window, select the Search automatically for drivers option if you don’t have the latest drivers installer on your PC.

- If you want to update the drivers manually, go to the manufacturer’s website and download the latest version. Save the downloaded drivers on your system hard disk.
- Select Browse my computer for drivers to update the driver manually.

- Restart the system
Uninstall Unnecessary Apps
There are many instances when you might have to install some applications for completing specific tasks. Most users tend to forget to uninstall such applications after using them. Such applications get accumulated in the system without any use. They would just take up memory spaces unnecessarily and make other apps run slower. The same goes for the unnecessary in-built Microsoft applications that are difficult to uninstall.
To uninstall such applications on Windows 11, here is what you need to do:
- Click on the Start button and select Settings from the Windows 11 Start Menu.

- From the left pane, click on Apps, and then select Apps & Features from the right pane.

- You will see the list of all the installed apps. Click on the three vertical dots next to the app you want to remove and select Uninstall from the menu.

- On the next prompt, click on Uninstall. The application will be uninstalled.

Delete Temporary Files
Temporary files unnecessary get accumulated in the system and take up valuable space. Such files might indirectly cause Windows 11 to slow down.
On Windows 11, it is easy to remove Temporary files. Here are the steps:
- Open Windows 11 Settings from the Start Menu.
- From the left pane, choose System settings and click on Storage from the right.
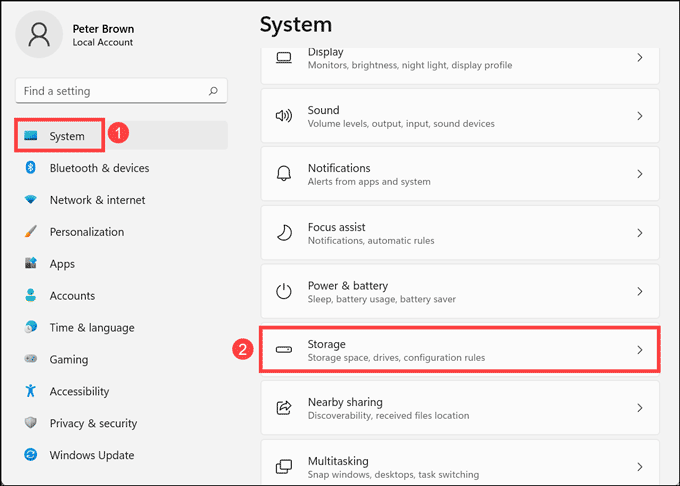
- Click on the Temporary files option.

- Tick all the boxes that you want to delete and click on Remove files.

Enable Best Performance Mode
If you are having trouble running some high-end applications on your Windows 11 system, you can optimize the battery settings for maximum performance and speed up Windows 11. On Windows 11, you have a Power Mode option that you can set according to how you use the PC. The Power Mode is basically for conserving the battery life.
To enable the high performance from Power Mode, follow these steps:
- Open Windows 11 Settings
- From the left pane, click System and choose Power & battery from the right side.
- Under the Power heading, you will notice the Power Mode.

- From the drop-down menu, select the Best performance option.

Close Background Apps
On your Windows 11 device, there are many applications and processes that require running in the background for the system’s proper functioning. However, in the midst of essential applications, some useless apps also gain the right to run in the background.
Such apps unnecessarily use the system resources and might contribute to the Windows 11 slow down. Luckily, we can disable such apps.
To disable the background apps on Windows 11, follow these steps:
- Open Start Menu and select Settings.
- From the left pane, click on Apps, and choose Apps & features.
- Now you have to check every application if it is permitted to run in the background.
- Click on the three vertical dots select Advanced options.

- Scroll down, and you will see the Background app permissions section.

- From the drop-down menu, choose the preferred background permission you like to provide to the application.

Enable Storage Sense
Storage Sense is an excellent Windows feature that automatically frees up space, deletes temporary files, and manages locally available cloud content. This helps in speeding the Windows 11.
Follow these steps to enable Storage Sense on Windows 11:
- Click on the Start button and select Settings from the Windows 11 Start Menu.
- From the left pane, select System and then click on Storage.
- Under Storage management, enable Storage Sense by toggling the button ON.

Sine PC can slow down when they run out of space, enabling the Storage Sense would ensure that the hard disk is clean from unnecessary stuff and does not ruin device performance.
Roll Back to Windows 10
Though Microsoft does not allow and recommend installing Windows 11 on unsupported devices, if you have forcefully done that, it will surely slow down the system. The only solution is to return back to Windows 10 or the previously installed Windows. For that, you can either freshly install it using bootable media, or if you have officially upgraded to Windows 11 from Windows 10, you can roll back from settings.
Here is how to roll back to Windows 10:
- Click on Start and Open Windows 11 Settings.
- Stay on the System settings tab and scroll down to click on the Recovery option.

- Under the Recovery Settings, click on the Go back.

- Follow the on-screen instructions to downgrade Windows 11.
An important point to note is, this option will only be available if you have upgraded to Windows 11 from Windows 10 without external installation, i.e., through an ISO file.
If you have freshly installed Windows 11 through a bootable device, the Go back option will not be available.
Upgrade Hardware
Sometimes just tweaking with the optimization options won’t speed up the Windows 11. You have to upgrade your system hardware for better performance. For that, you can add more RAM for virtual memory and an SSD for physical storage.
Adding more RAM would let you open more number of applications at once or launch more tabs on your browser. Though Windows 11 minimum required RAM is 4 GB, your system should at least have 8 GB of RAM for proper functioning.
In the same way, adding an SSD would also speed up your system. An SSD loads everything faster compared to HDDs. So, if you add an SSD to your computer and install OS and applications on it, they would load quicker than now.
Apart from these two, you can also enhance your GPU power by adding a powerful graphic card. Since the GPU handles most of the graphical things on the computer, increasing its power would make your PC smooth, especially while playing games or high definition videos and movies.
Summing Up
If your computer is running slowly, there are a number of things that you can do to speed it up. In this guide, we have covered the basics as well as some more advanced solutions. If you follow these tips, your computer should be running like new in no time!
Since Windows 11 is still new there might be several compatibility issues making it slower. So as of now, Windows 11 is comparatively slower than Windows 10.
The minimum RAM requirement for installing Windows 11 is 4GB. But it is recommended to install it on a system with at least 8GB RAM.
Peter is an Electrical Engineer whose primary interest is tinkering with his computer. He is passionate about Windows 10 Platform and enjoys writing tips and tutorials about it.
