VPN is a virtual private network that provides security and privacy to users. It encrypts your internet traffic and hides your IP address, making it difficult for hackers or anyone else to hack your WiFi and track what you are doing online. VPNs are often used by businesses to allow their employees to connect to the company’s network while they are working from home or on the go.
Windows 10/11 comes with a built-in VPN client, which makes it easy to set up a VPN connection and protect your privacy. It helps you to connect to any VPN service without any third-party tool. So, if you don’t want to install an additional application for securing your network, the built-in VPN client of Windows is a great option for you.
To fix various Windows 10/11 problems, we recommend Outbyte PC Repair:
This software will repair common computer errors, protect you from file loss, malware damage, hardware failure, and optimise your computer for peak performance. In three simple steps, you can resolve PC issues and remove virus damage:
- Download Outbyte PC Repair Software
- Click Start Scan to detect Windows 10/11 issues that may be causing PC issues.
- Click Repair All to fix issues with your computer's security and performance.
This month, Outbyte has been downloaded by 23,167 readers.
In this article, we will show you how to use the built-in Windows VPN client to secure your internet connection.
Pre-requisites for Starting Up With Windows VPN
Before getting started, you need to have the following:
- A Windows computer with administrative privileges
- An active Internet connection
- The name of your VPN provider.
- The IP address of the VPN server that you want to connect to. This can be obtained from your VPN provider.
- Know the authentication type. Most VPN services use a regular username and password to authenticate the connection.
- Your VPN provider’s login credentials (username and password)
You can easily find the above information by contacting your VPN provider or checking their website.
How to use a Built-in Windows VPN?
To use a built-in Windows VPN, follow these steps:
- Open Windows Settings
To start setting up a VPN connection on your Windows computer, first, you need to open the Windows settings. You can do this by clicking on the Start menu and then selecting Settings.

- Select “Network & internet”
In the Windows settings, select Network & Internet from the left pane and select VPN settings from the right.
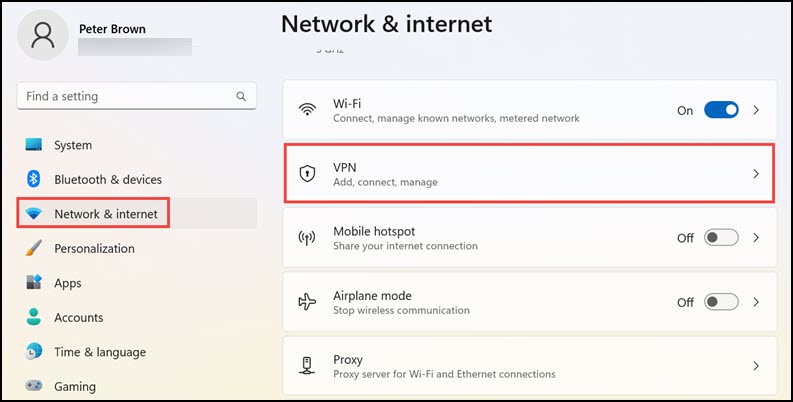
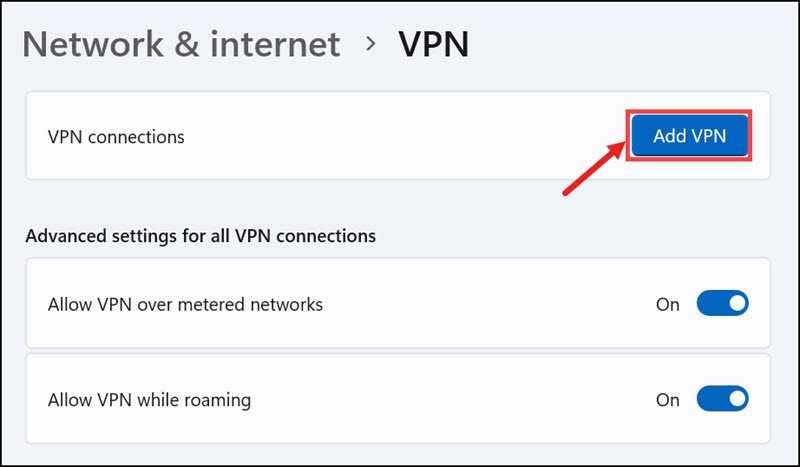
- Click “Add VPN”
On the VPN settings page, click on Add VPN button next to the VPN connections.
- Fill in the VPN details
In the Add a VPN connection window, fill in the following details:
– VPN provider: select “Windows (built-in)” from the drop-down menu.
– Connection name: Enter a name for the VPN connection. This can be anything you want.
– Server name or address: Enter the IP address of the VPN server that you want to connect to.
– VPN type: Select “Point to Point Tunneling Protocol (PPTP)” from the drop-down menu.
– Type of sign-in info: select “User name and password” from the drop-down menu.
– User name (optional): Enter your VPN username.
– Password (optional): Enter your VPN password.
Click on the Save button to save the VPN connection details.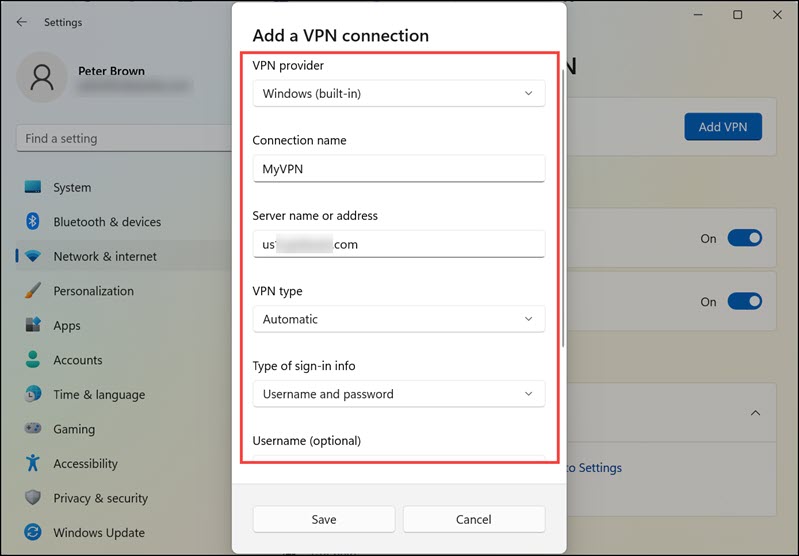
- Connect to a VPN server
To connect to a VPN server, click on the connection that you have created and then click on the Connect button.
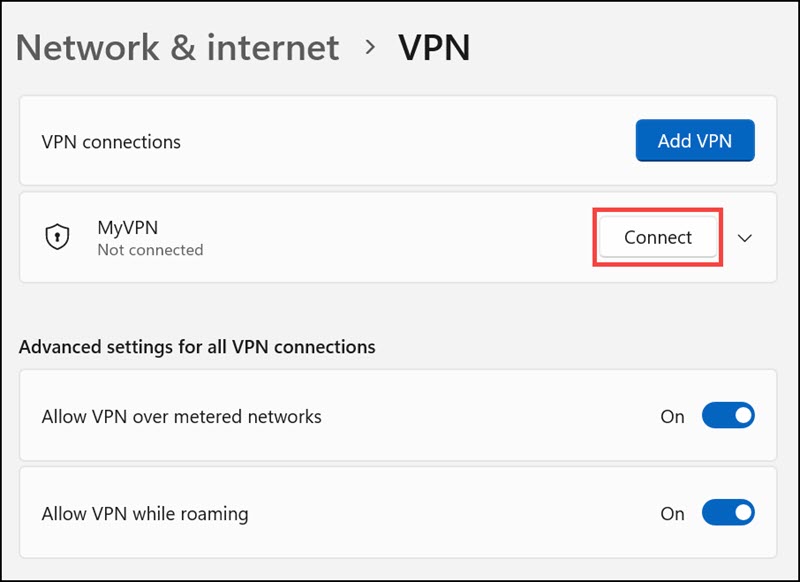
- Enter Login Details
Enter your VPN login credentials when prompted and click on the OK button.
You will now be connected to the VPN server.

You will now be connected to the VPN server.
Limitations of Windows Built-in VPN
Although the built-in Windows VPN client is easy to use and provides a lot of features, there are some limitations to it.
- The biggest limitation is that it does not support all VPN protocols. Windows only support PPTP, LTP, and IKEv protocol for VPN connections. So, if your VPN service uses any other protocol, you will not be able to use the built-in VPN client.
- Another limitation is that it does not provide any advanced features like a kill switch or DNS leak protection.
- Lastly, the built-in VPN client does not work with all VPN providers. Some VPN providers have their own custom clients that you need to use in order to connect to their servers.
To overcome the limitations of the built-in VPN client, you can use a third-party VPN app to get advanced privacy options. You will get all the features that are missing in the built-in VPN client and also supports all protocols.
Final Words
The built-in Windows VPN client is a great option if you are looking for an easy-to-use VPN client. However, it has some limitations that you should be aware of before using it. If you need advanced features or want to use a different protocol, we recommend using a third-party VPN app.
Do you have any tips on how to use a built-in Windows VPN? Let us know in the comments below!
Windows built-in VPN uses the PPTP, LTP, and IKEv protocols which are considered to be less secure than other protocols. So, if security is your main concern, we recommend using a third-party VPN app.
Yes, you can use a free VPN with Windows. However, we recommend using a paid VPN service as they usually offer better security and privacy options.
Peter is an Electrical Engineer whose primary interest is tinkering with his computer. He is passionate about Windows 10 Platform and enjoys writing tips and tutorials about it.