Are you having problems with your Windows lock screen slideshow? Are the images not rotating as they should? If so, don’t worry – you’re not alone.
A lot of people are reporting this issue, and we have a fix. In this blog post, we will walk you through the steps to take to get your slideshow working properly again.
To fix various Windows 10/11 problems, we recommend Outbyte PC Repair:
This software will repair common computer errors, protect you from file loss, malware damage, hardware failure, and optimise your computer for peak performance. In three simple steps, you can resolve PC issues and remove virus damage:
- Download Outbyte PC Repair Software
- Click Start Scan to detect Windows 10/11 issues that may be causing PC issues.
- Click Repair All to fix issues with your computer's security and performance.
This month, Outbyte has been downloaded by 23,167 readers.
What is Windows Lock Screen Slideshow?
Windows Lock Screen Slideshow is a feature that allows you to display a rotating selection of images on your lock screen. When enabled, Windows will download new images automatically from Bing and display them on your lock screen.
Why is my Windows Lock Screen Slideshow not working?
There are several reasons why your Windows Lock Screen Slideshow might not be working:
- The most common reason is that the feature is turned off in your settings. To check if this is the case, head to Start -> Settings -> Personalization -> Lock Screen and make sure that the “Slideshow” option is turned on.
- Another possibility is that the Bing image database doesn’t have any new images for your lock screen. This can happen if you’ve been using the same set of images for a while.
- If you have manually enabled the slideshow, it is possible that the images inside the slideshow folder are deleted thus causing the Windows Lock Screen Slideshow Not Working issue.
How to fix Windows Lock Screen Slideshow Not Working?
If you’ve checked the settings and confirmed that the Slideshow is turned on but it’s still not working, don’t worry. We have a few more steps for you to try.
Make sure that the Images are not Deleted
As mentioned earlier, if the images inside the Slideshow folder are deleted, Windows will not be able to display them on your lock screen.
To check if this is the case, follow these steps:
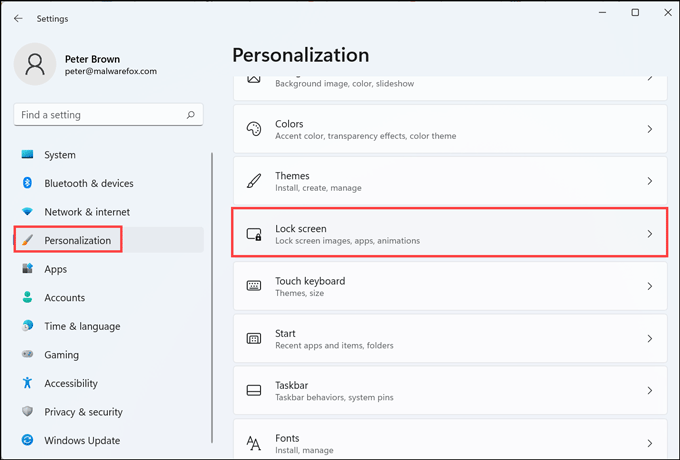
- Click on the Start button and open Windows 11 settings.

- Switch to the Personalization tab on the left and select the Lock screen on the right.
- Under the Lock screen settings, expand the drop-down menu next to Personalize your lock screen and click on the Slideshow option from the list.

- Now click on Browse to choose a folder containing all the slideshow images.
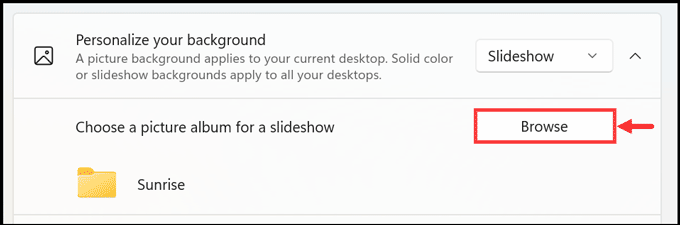
- Make sure the folder that you chose has pictures that you intend to have on the slideshow.
Don’t turn off the screen after the Slideshow
It is essential that you don’t turn off the screen after the Slideshow time has elapsed. If you do, Windows will not be able to show new pictures on your lock screen.
Here are the steps to enable that option:
- Click on the Start button and open Windows 11 settings.
- Switch to the Personalization tab on the left and select the Lock screen on the right.
- Under the Lock screen settings, expand the drop-down menu next to Personalize your lock screen and click on the Slideshow option from the list.
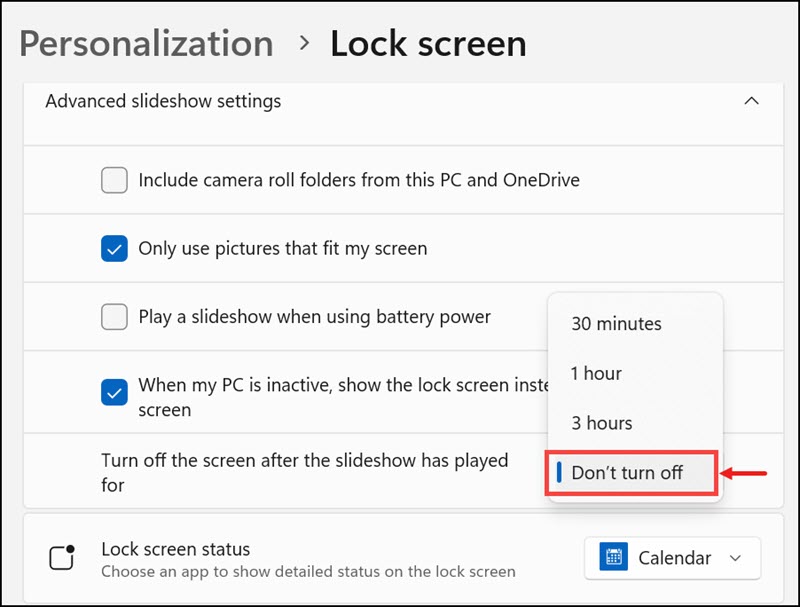
- Now, expand the Advanced slideshow settings.

- Expand the drop-down menu next to Turn off the screen after the slideshow has played for and select Don’t turn off.
Enable Slideshow when Battery Powered
If you’re having trouble getting the Slideshow to work when your computer is running on battery power, you can try enabling the Slideshow when Battery Powered setting.
Here’s how:
- Click on the Start button and open Windows 11 settings.
- Switch to the Personalization tab on the left and select the Lock screen on the right.
- Under the Lock screen settings, expand the drop-down menu next to Personalize your lock screen and click on the Slideshow option from the list.
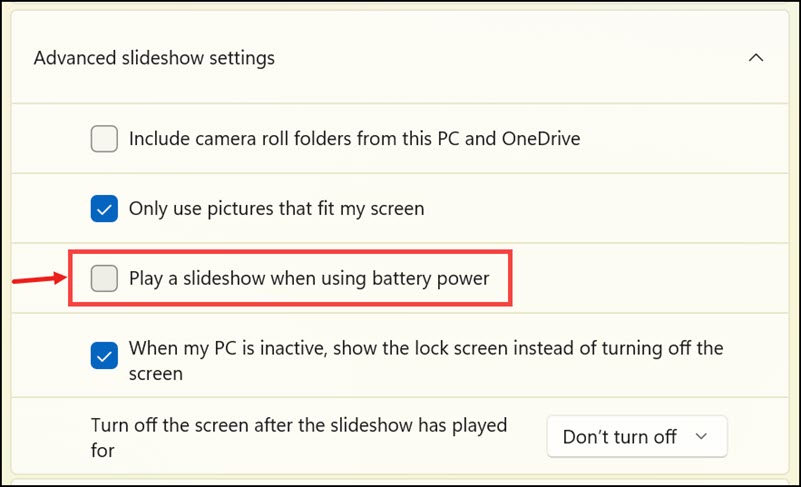
- Now, expand the Advanced slideshow settings.
- Check the box to enable the Play a slideshow when using battery power.
Check if Slideshow is Blocked from Registry Editor
There’s a possibility that the Slideshow feature is turned off in your Registry Editor. To check if this is the case, follow these steps:
- Open Registry Editor by pressing Windows + R and typing “regedit” into the Run dialogue box.
- Click on OK to open Registry Editor.
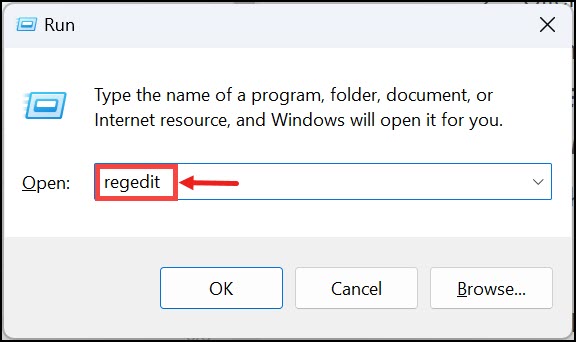
- In the left pane of Registry Editor, navigate to the following key: HKEY_LOCAL_MACHINE\SOFTWARE\Policies\Microsoft\Windows\Personalization
- Click on the Personalization key to select it and check if NoLockScreenSlideshow DWORD is in the right pane.
- If you find the NoLockScreenSlideshow Right-click on it and select Delete.

Allow Lock Screen Slideshow in GPEDIT
If you’re still having trouble getting the Slideshow to work, you can try enabling it through GPEDIT.
Here’s how:
- Open Local Group Policy Editor by pressing Windows + R and typing “gpedit.msc” into the Run dialogue box.
- Click on OK to open Local Group Policy Editor.

- In the left pane of Local Group Policy Editor, navigate to the following path: Computer Configuration\Administrative Templates\Control Panel\Personalization
- In the right pane, find and double-click on Do not display the lock screen.

- Make sure it is Disabled or Not Configured.
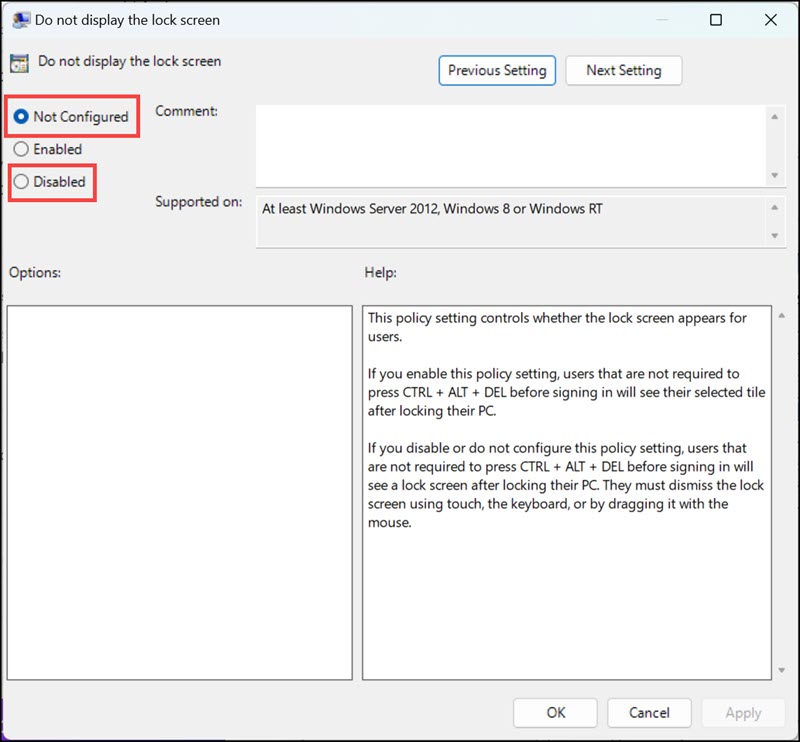
- Restart your computer for the changes to take effect.
Clean Install Windows
If you followed all the steps above and the Slideshow feature still isn’t working on your Windows 11 computer, it’s likely that there is a problem with your system files. In this case, the best course of action would be to perform a clean install of Windows 11.
A clean install will delete all your files, so be sure to backup your data before proceeding.
Summing Up
If your Windows Lock Screen Slideshow is not working, you can try following these steps:
- Make sure the slideshow images are present in the slideshow folder.
- Enable Slideshow when Battery Powered.
- Check if the Slideshow is blocked from Registry Editor.
- Allow Lock Screen Slideshow in GPEDIT.
- Perform a clean install of Windows 11.
If you followed all the steps above and the Slideshow feature still isn’t working on your Windows 11 computer, it’s likely that there is a problem with your system files. In this case, the best course of action would be to perform a clean install of Windows 11.
We hope this article was helpful in getting your Windows Lock Screen Slideshow working again.
You can change the Windows 11 lock screen by going to the Start menu, selecting Settings, and then choosing Personalization. From there, you will be able to select your desired lock screen image.
The recommended resolution for the Windows 11 lock screen is 1920×1080. However, you may be able to use a lower resolution if your computer does not support the full 1080p.
If you’re still having trouble with your Windows 11 lock screen, you can try restarting your computer or performing a clean install of the operating system.
Peter is an Electrical Engineer whose primary interest is tinkering with his computer. He is passionate about Windows 10 Platform and enjoys writing tips and tutorials about it.
