If you’re having problems with Windows Defender exclusions not working, don’t worry – you’re not alone. This is a common issue that many people experience, but it can be fixed fairly easily. In this article, we will discuss the causes of this problem and how to fix it.
What is Windows Defender Exceptions?
Before we get into how to fix the problem, let’s first discuss what Windows Defender exceptions are and why they exist. Exceptions are simply files, folders, or processes that you exempt from being scanned by Windows Defender. This can be useful if you have a file or folder that is constantly being flagged as malware by mistake, or if you want to speed up scanning by excluding files that you know are safe.
To fix various Windows 10/11 problems, we recommend Outbyte PC Repair:
This software will repair common computer errors, protect you from file loss, malware damage, hardware failure, and optimise your computer for peak performance. In three simple steps, you can resolve PC issues and remove virus damage:
- Download Outbyte PC Repair Software
- Click Start Scan to detect Windows 10/11 issues that may be causing PC issues.
- Click Repair All to fix issues with your computer's security and performance.
This month, Outbyte has been downloaded by 23,167 readers.
There are two different types of exceptions that you can configure in Windows Defender: temporary and permanent. Temporary exceptions only last until the next time that you scan your computer, while permanent exceptions remain in place until you remove them manually.
How to Add an Exception to Windows Defender?
Adding an exception to Windows Defender is fairly simple. Here is how to do that:
- Launch Windows 11 Settings by clicking on the Start Menu and selecting its icon.

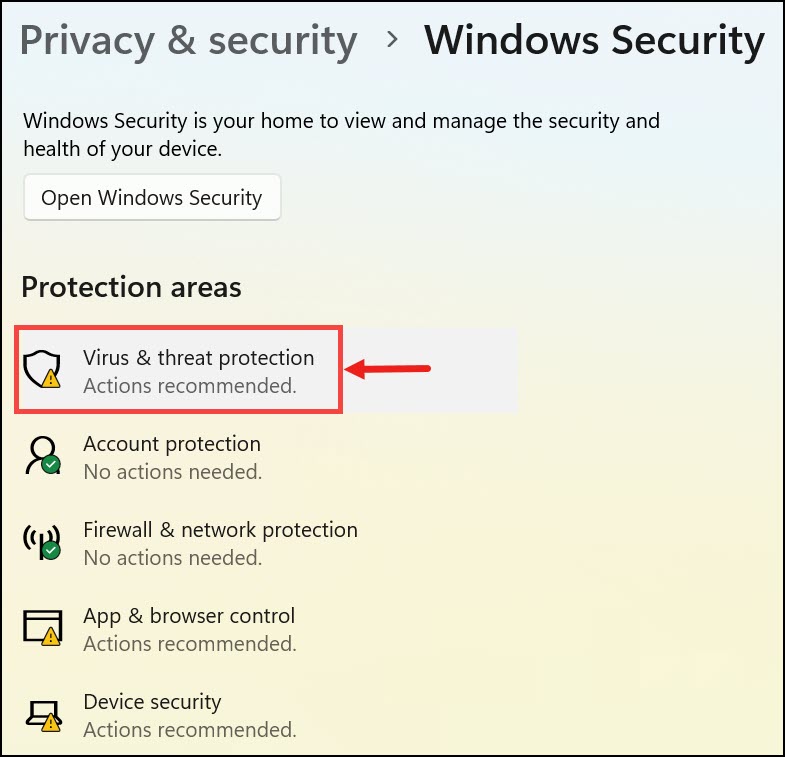
- Switch to the Privacy & security tab on the left and select Windows Security from the right.

- Under Windows Security choose Virus & threat protection option.
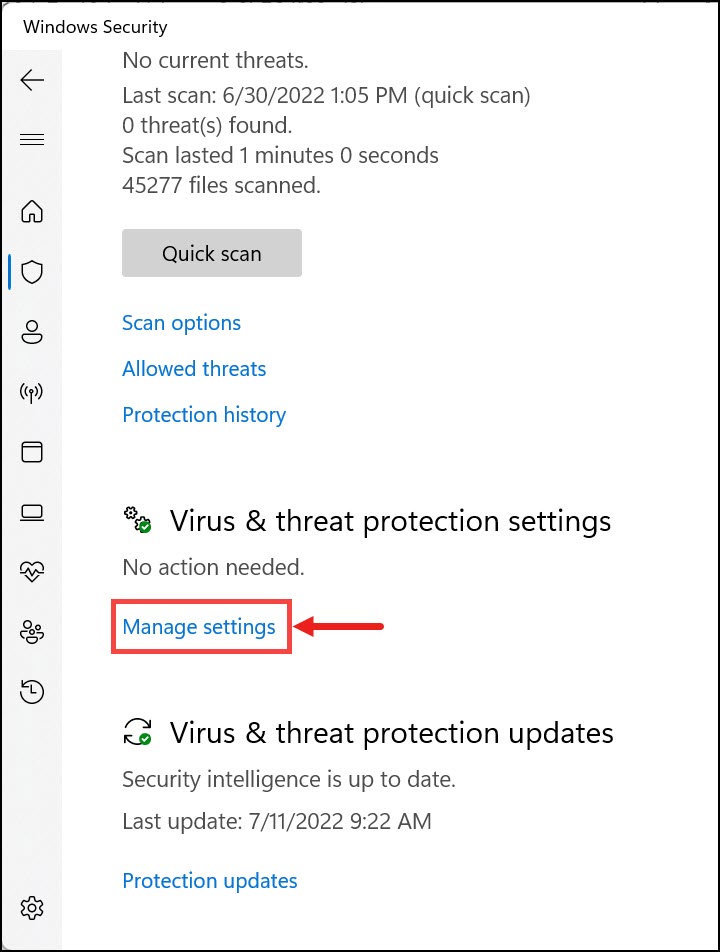
- Select Manage settings under the Virus & threat protection settings.
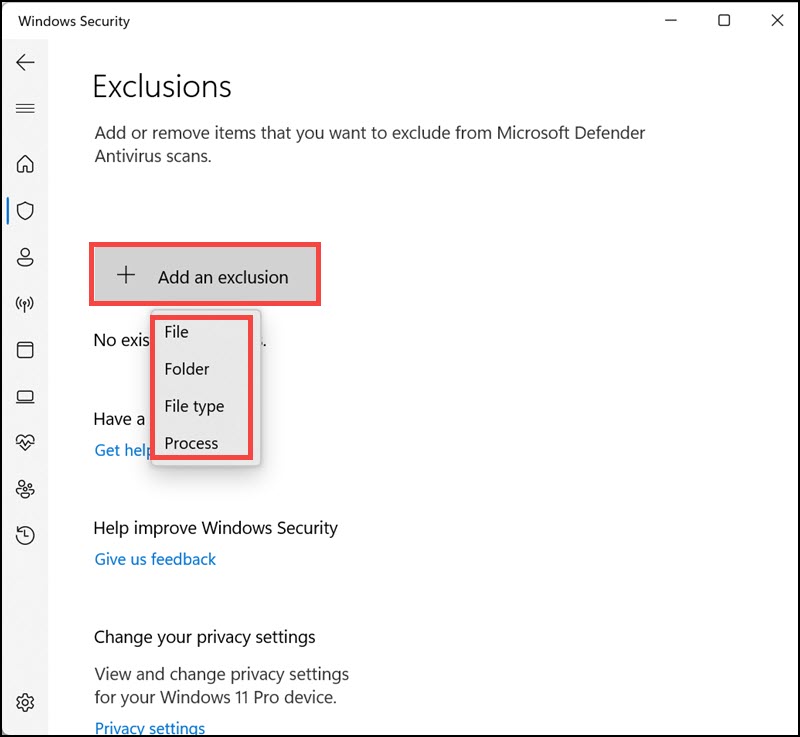
- Now, scroll down and click on Add or remove exceptions under the Exceptions heading.

- Click on the Add Exception button and select a file or folder that you want to exclude from Windows Defender scanning.
Why do Windows Defender Exclusions not working?
There can be several reasons why your Windows Defender exclusions are not working.
- One possibility is that the file or folder that you’re trying to exclude is already infected with malware. In this case, adding an exclusion will not help because the malware will still be detected when Windows Defender scans the file or folder.
- Another possibility is that the path of the file or folder that you’re trying to exclude is incorrect. This can happen if you move the file or folder to a different location on your computer. To fix this, simply remove the old exclusion and add a new one with the correct path.
- Finally, it’s also possible that your Windows Defender exclusions are not working because of a bug in the software. If this is the case, you can try restarting your computer or reinstalling Windows Defender.
Fix Windows Defender Exclusions Not Working
If your Windows Defender exclusions are not working, there are a few things that you can do to try and fix the problem.
Ensure that you haven’t changed the File/Folder Location
The first thing that you should do is make sure that the file or folder that you’re trying to exclude has not been moved to a different location on your computer. If it has, then you will need to remove the old exclusion and add a new one with the correct path.
Check if the File/Folder is Infected
If the file or folder that you’re trying to exclude is infected with malware, adding an exclusion will not help. In this case, you should scan the file or folder with a different antivirus program to remove the malware.
Update Windows
If you’re using an outdated version of Windows, it’s possible that the problem is caused by a bug that has since been fixed. To fix this, simply update your operating system to the latest version.
- Open Windows 11 Settings.
- On the left pane, switch to the Windows Update tab and click on Check for updates on the right.

- After the latest updates are finished downloading, click on Install now.

- Restart your device.
Conclusion
If your Windows Defender exclusions are not working, there are a few things that you can do to try and fix the problem as listed in this post. If you still can’t get it to work, then you may need to contact Microsoft support for further assistance.
Yes, you can exclude a whole drive from Windows Defender scanning by adding an exception for the drive letter (for example, “D:\”).
Yes, you can exclude a specific file type from Windows Defender scanning by adding an exception for the file extension.
No, excluding a file or folder from Windows Defender scanning will not make your computer less secure. However, you should only exclude files or folders that you trust not to be infected with malware.
There are several possible reasons why your exclusion might not be working. One possibility is that the file or folder is already infected with malware. Another possibility is that the path of the file or folder is incorrect. Finally, it’s also possible that there is a bug in Windows Defender.
Peter is an Electrical Engineer whose primary interest is tinkering with his computer. He is passionate about Windows 10 Platform and enjoys writing tips and tutorials about it.
