Are you having trouble using your touch screen on Windows 11? Maybe you find that it’s not as accurate as you’d like or that it is constantly getting touched accidentally by your hands or other objects. If so, there is a way to disable it!
In this blog post, we will show you how to disable the touch screen in Windows 11 with just a few simple steps.
To fix various Windows 10/11 problems, we recommend Outbyte PC Repair:
This software will repair common computer errors, protect you from file loss, malware damage, hardware failure, and optimise your computer for peak performance. In three simple steps, you can resolve PC issues and remove virus damage:
- Download Outbyte PC Repair Software
- Click Start Scan to detect Windows 10/11 issues that may be causing PC issues.
- Click Repair All to fix issues with your computer's security and performance.
This month, Outbyte has been downloaded by 23,167 readers.
Keep reading to learn more!
Why you need to Disable Touch Screen in Windows 11
There are many reasons why you might want to disable the touch screen in Windows 11. It can be that it’s not accurate enough or that your hands accidentally press on the screen while you’re typing.
Maybe you just don’t need it and would like to keep your laptop’s battery life longer by disabling it. Whatever the reason may be, disabling the touch screen might improve your computing experience.
How to Disable Touch Screen in Windows 11
The process of disabling the touch screen in Windows 11 is quite simple and should only take a few minutes of your time. Here’s what you need to do:
- Right-click on the Start button and select Device Manager.

- Find the Human Interface Devices option and expand it.
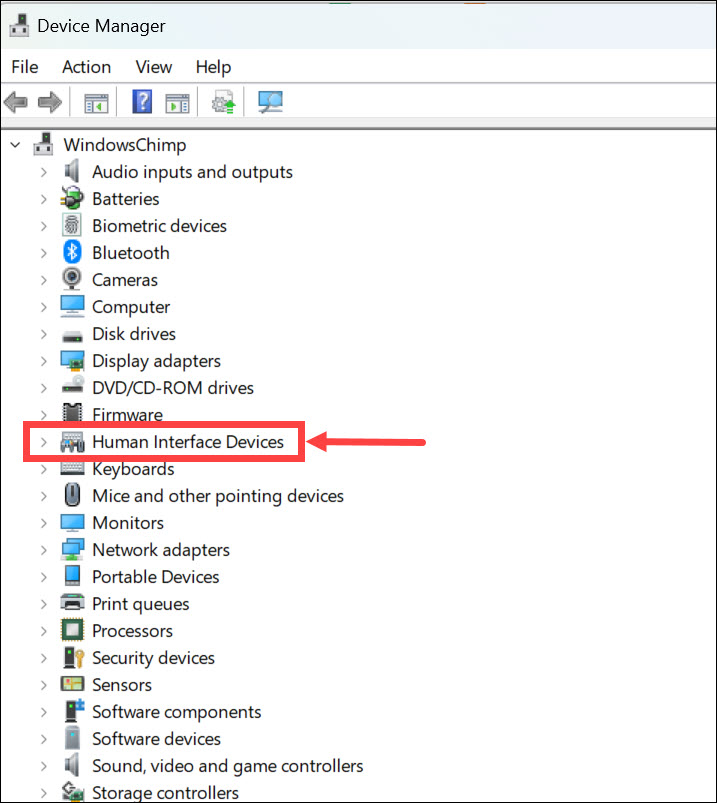
- Select the touchscreen devices listed here. Right-click on the HID-compliant touch screen and choose Disable device from the context menu.

- If prompted, confirm that you want to disable the device by clicking Yes.

- The touch screen will now be disabled.
- To re-enable it, follow the above steps, right-click on the HID-compliant touch screen and choose Enable from the context menu.

Disable Touch Screen Using Windows Terminal
You can also disable the touch screen from your Windows terminal, which is a great way to make changes quickly.
To do so, follow these steps:
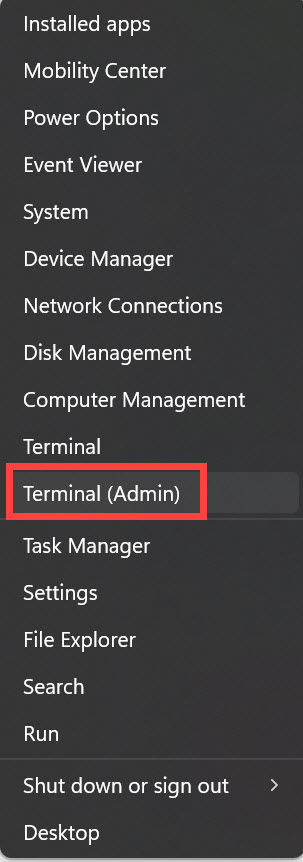
- Right-click on the Start button and select Terminal (Admin) to launch Windows Terminal with administrator rights.
- In the Windows Terminal, type in the following command: Get-PnpDevice | Where-Object {$_.FriendlyName -like ‘*touch screen*’} | Disable-PnpDevice -Confirm:$false
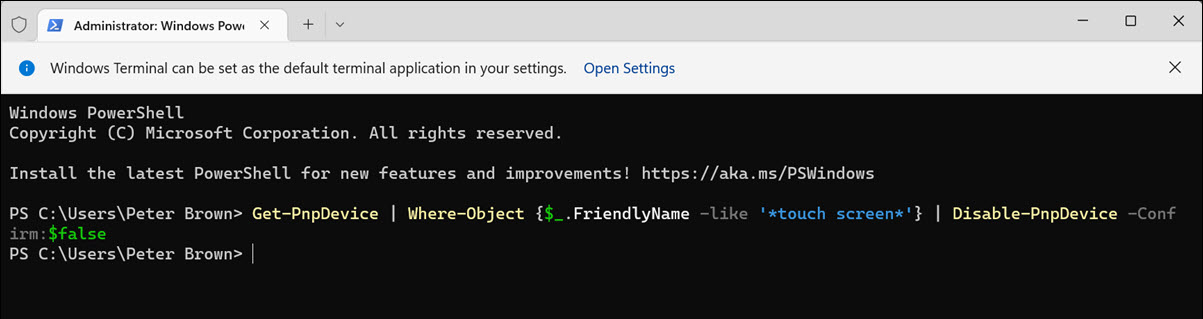
- Press Enter, and the process will be completed instantly.
- If you want to re-enable the touch screen, use the following command: Get-PnpDevice | Where-Object {$_.FriendlyName -like ‘*touch screen*’} | Enable-PnpDevice -Confirm:$false

Summing Up
We hope this blog post has helped you learn how to disable the touch screen in Windows 11 with just a few simple steps. Remember, if you ever need to re-enable the touch screen, follow the same steps but with Enable instead of Disable when prompted.
Yes, it does! Disabling the touch screen will help conserve system resources and can significantly extend your laptop’s battery life.
Absolutely! You can still use your laptop without a touch screen. You just won’t be able to use the touch gestures and may need to use the keyboard and mouse instead.
Yes, it is! You can re-enable the touch screen at any time using the same steps described above but with Enable instead of Disable when prompted.
Yes, it can! Disabling the touch screen will prevent accidental touches and improve your overall computing experience.
Peter is an Electrical Engineer whose primary interest is tinkering with his computer. He is passionate about Windows 10 Platform and enjoys writing tips and tutorials about it.
